xro's note on Camping/Tent Rope Tensioners
(german: Seilspanner)
Recently for CCCamp2023, I wanted to upgrade my new tent with fancy cord and spanners and thus, inadvertently, came to test and compare a few. Here's what I learned.
rope tensioners - the types tested

The five types of tensioners I tested.
- modern 3 hole straight (black)
- classic 3 hole triangle (metallic)
- minimalistic bent 2-hole (red)
- thread-able-in-after-the-fact with 2 small and one big hole (red)
- tauntline hitch knot
The tensioners were rated according to performance in the following disciplines:
- packing-size / space needed in your packed tent
- how well it holds tension under force
- how good it looks
- ease of slackening or tensioning the line
TLDR
- get the classic 3 hole triangle spanner or stick with straight 3 hole spanner that came with your tent.
- if you need to have on of the nice metallic Chinese ones, get
- either the straight 3 hole version that imitates the (black) modern 3-hole tensioners, but with open holes.
- or the 2-hole version and use it with a Palstek as explained below
- optionally learn the tensioning-knot
- ignore the rest
rope tensioner - the classic 3 hole triangle
This is the best tensioner you can buy. The design is old but still the best.

| discipline | verdict |
|---|---|
| packing-size | as small as other smallest. lightweight and durable in aluminium. |
| holding tension | very very well |
| looks | classic |
| ease of slackening/tensioning | easy |
rope tensioner - the modern 3 hole straight version
Can be seen in black plastic in top picture. This is what most tents ship with today. Works very well. Plastic could become brittle after many years of of sun.
| discipline | verdict |
|---|---|
| packing-size | in plastic ab bit larger than triangle |
| holding tension | very well |
| looks | good |
| ease of slackening/tensioning | easy but not as easy as with triangle version |
big Chinese aluminium tensioner with big hole
This one looks very cool.
It also has a very intriguing feature: You can thread it into the tensioned line between the tent and peg, after the fact.
Having said that, these tensioners unfortunately fail in their core purpose. Once threaded in, you can barely move them to tension the line. You also can't thread them in without slackening the line, so threading them into a tensioned line does not work either. To really top things off, they easily slide away in the slackening direction once there is pull on the rope.


| discipline | verdict |
|---|---|
| packing-size | unnecessarily big |
| holding tension | bad |
| looks | cool |
| ease of slackening/tensioning | bad |
Fixing-Attempt Alternate Hole
The two smaller holes are actually intended for two different diameters of rope. However, the size of the bend also influences friction. So to this the problem of not being able to tighten the line, we can just tie the thin rope into the middle-sized hole and thread it around the smaller bend.
While this improves things slightly, tightening the rope is a hard chore. On top of that, it now slackens even easier by itself under pull.
| discipline | verdict |
|---|---|
| packing-size | unnecessarily big |
| holding tension | worse |
| looks | cool |
| ease of slackening/tensioning | still bad |
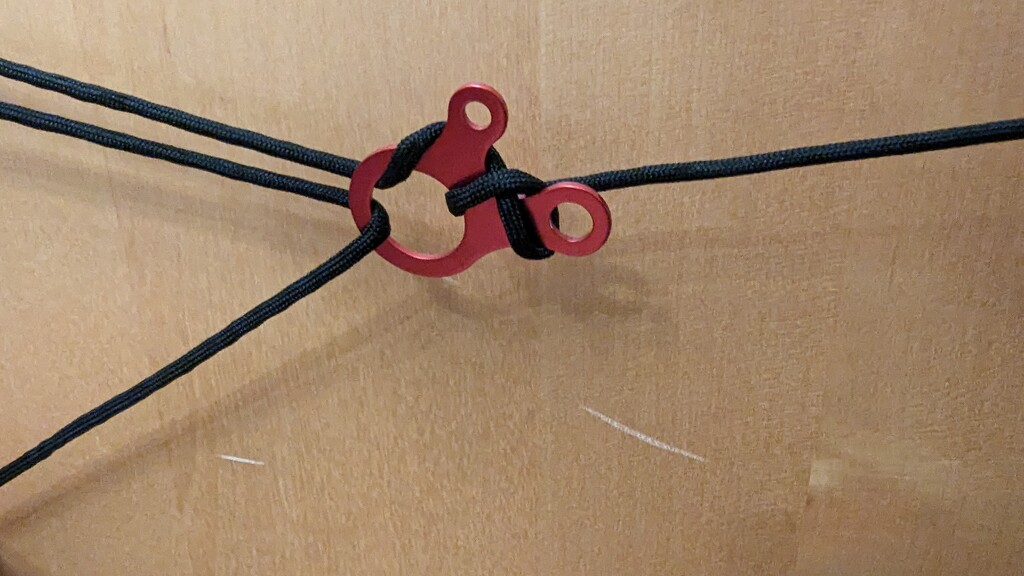
Fixing-Attempt: used like a triangle 3 hole
Since the cool looking tensioners have 3 holes, we can use them like the 3-hole-triangles. That works reasonable well. However, the original 3-hole-triangles still work better and use less space, so there is no reason to use the big-hole tensioners this way when I can just buy the original triangle version.

| discipline | verdict |
|---|---|
| packing-size | unnecessarily big |
| holding tension | ok |
| looks | cool |
| ease of slackening/tensioning | ok |
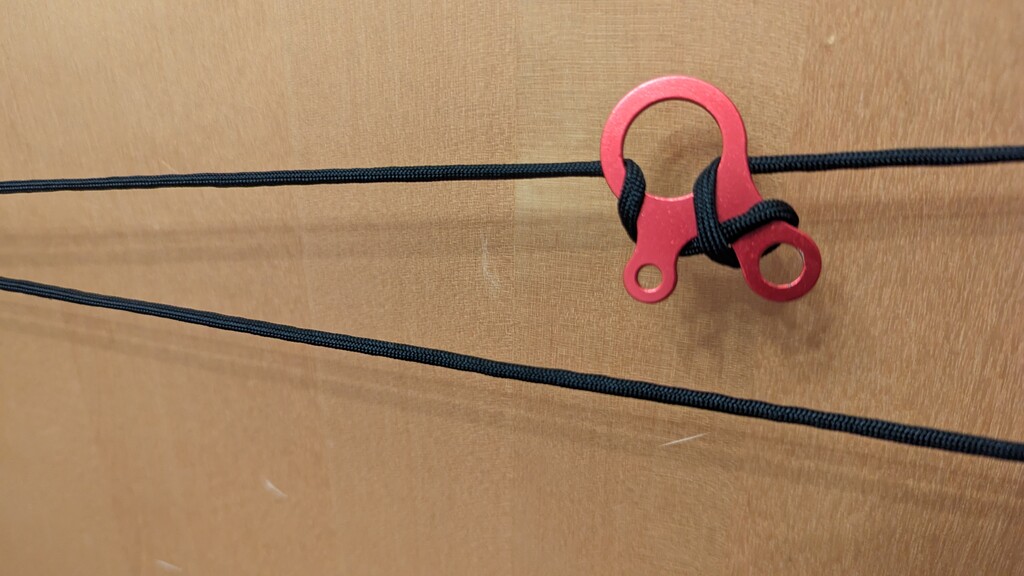
Alternate use as winch
What remains is their cool ability to be threaded into an already existing line.
That still makes them ideal to install looks into an existing line. e.g. to
- hang things or span additional perpendicular lines.
- use them in a pulley system for e.g. hammocks
Photo-Example of threading them into existing line and then using them as winch in a pulley system to really tighten the line.


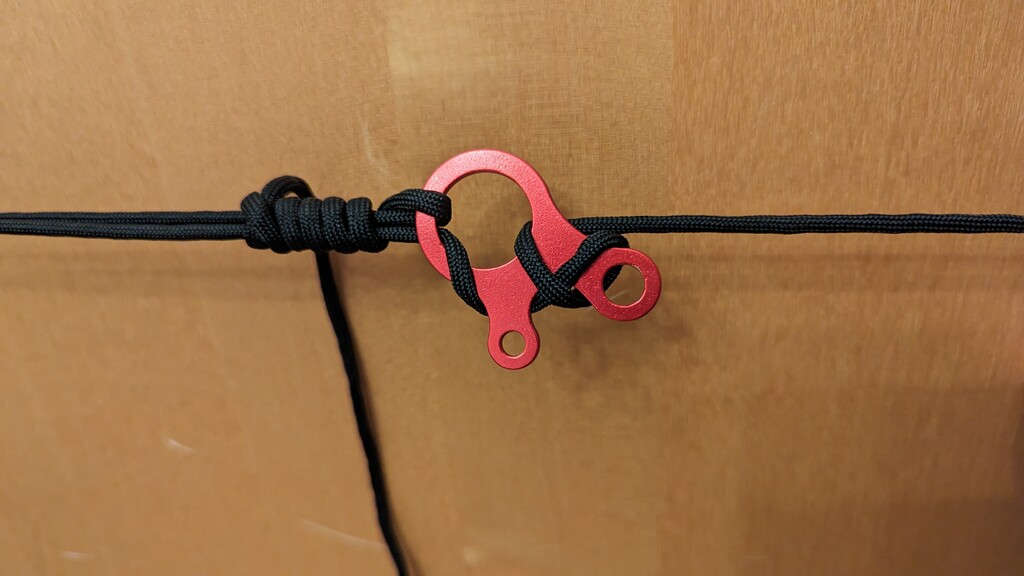
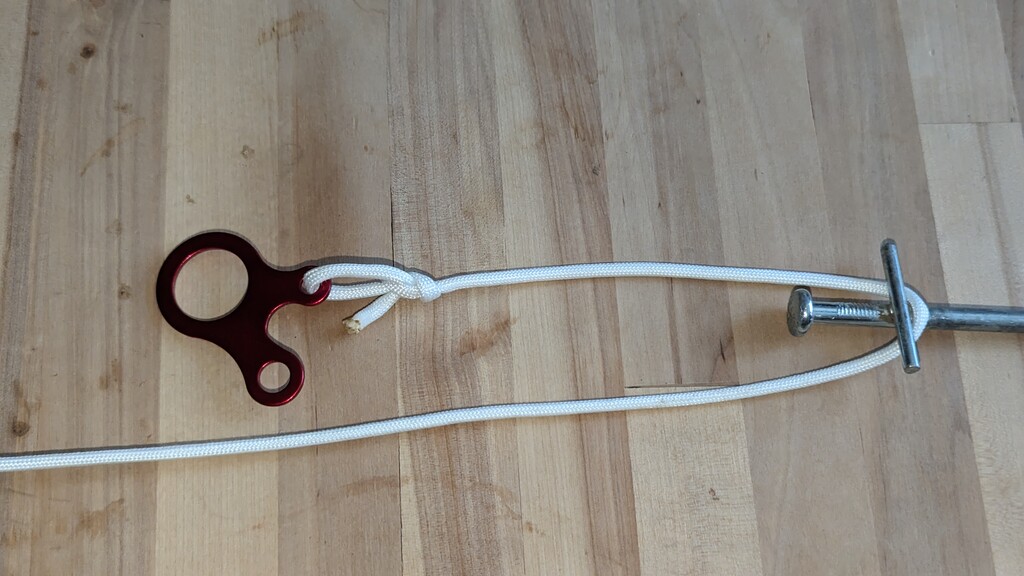
Chinese aluminium tensioner with 2 holes and bent shape
Their working principle is that under tension, the rope will be tensioned by the bend and the single hole will exert enough friction for the line to hold. However this very much depends on the rope running around a peg with a tiny radius. For starters it wont as work as well when the line goes around a tree, lamp posts or something slightly thicker. Even so, the rope tends to slide through when there is a strong pull on the line. If you don't expect a lot of tension though, then they are easy as butter to adjust. (But then what did we buy rope that can hold 1500-2500 Newton for? ![]() )
)


In size, they are about between the classic 3-hole-triangle and the modern 3-hole-straight tensioners. Definitely smaller than the Chinese big-hole version, but not as small as one would expect.

| discipline | verdict |
|---|---|
| packing-size | small |
| holding tension | ok-ish, but slides off under strong pull |
| looks | nice |
| ease of slackening/tensioning | almost too easy |
Improvement-Attemt: more angle
Well, let's not give up. These fancy new Chinese tensioners can't all be shit. Maybe we can improve the friction be threading in the end of the rope from the other side. Thus when the line is tensioned there is more angle and more friction.

This does actually improve things, but not in a significant way. So same rating as before.
| discipline | verdict |
|---|---|
| packing-size | small |
| holding tension | ok-ish, but slides off under strong pull |
| looks | nice |
| ease of slackening/tensioning | almost too easy |
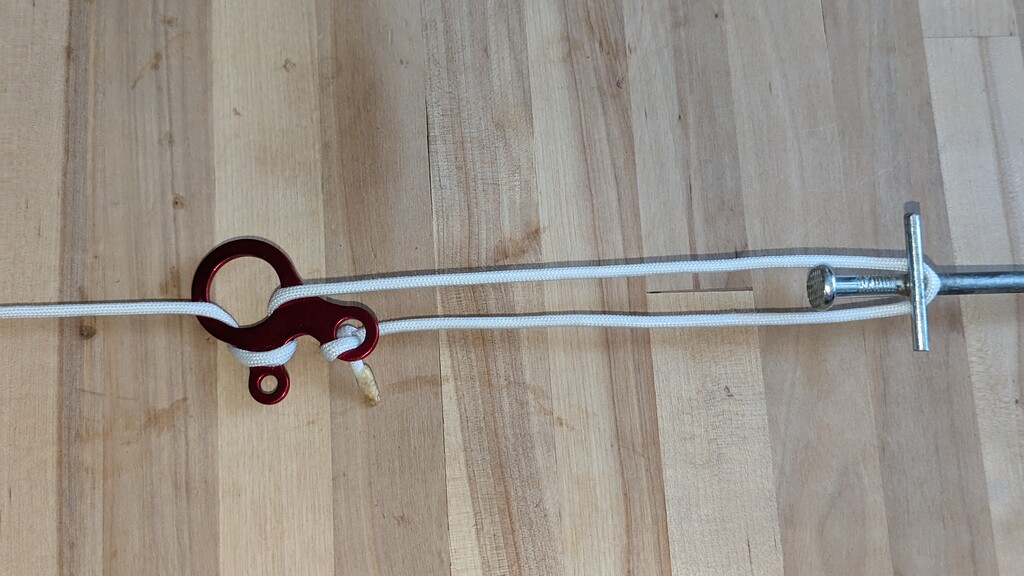
Improvement-Attemt: with Palstek
I played around a bit more and finally came up with a way to make them work perfectly. Instead of using a knot in the second hole, we can use a Palstek-loop through the hole and round the line. Once tensioned, the loop will a) hold the line down over the whole surface and bend of the tensioner and b) the loop itself will pull the line into the hole and create additional friction.

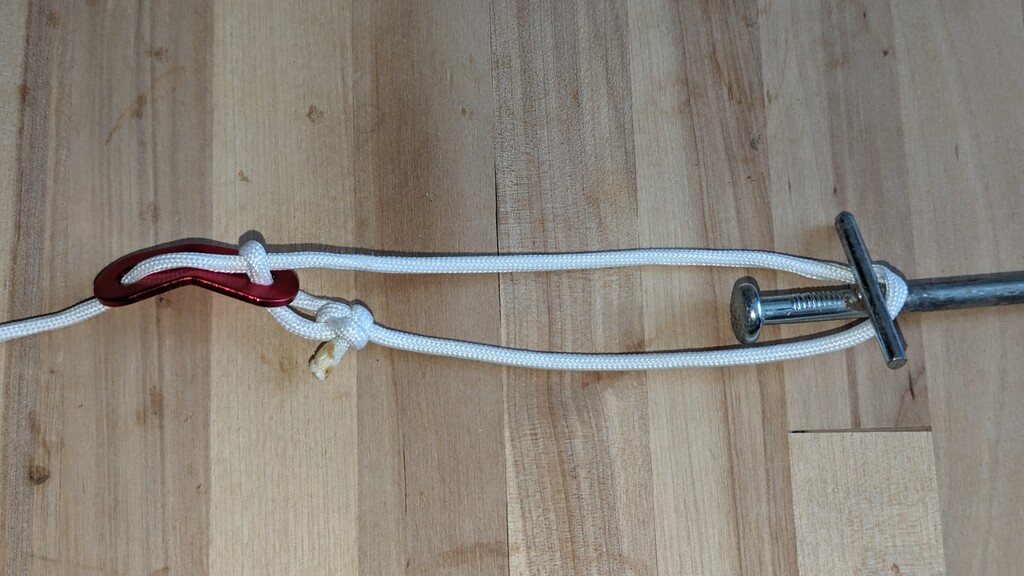

This works really well. The line does not move even a millimeter under strong pull and is still very easy to adjust.
| discipline | verdict |
|---|---|
| packing-size | small |
| holding tension | very good |
| looks | nice |
| ease of slackening/tensioning | very easy |
tautline hitch - tensioning rope with rope
search YouTube for “tensioning knots” , e.g. this link
This knot is really handy to know and dispenses away with your need for an extra tensioner.
| discipline | verdict |
|---|---|
| packing-size | unbeatable as you have only rope |
| holding tension | ok |
| looks | like rope. demonstrates your knot-foo |
| ease of slackening/tensioning | good |
Aluminium Ring Tensioner
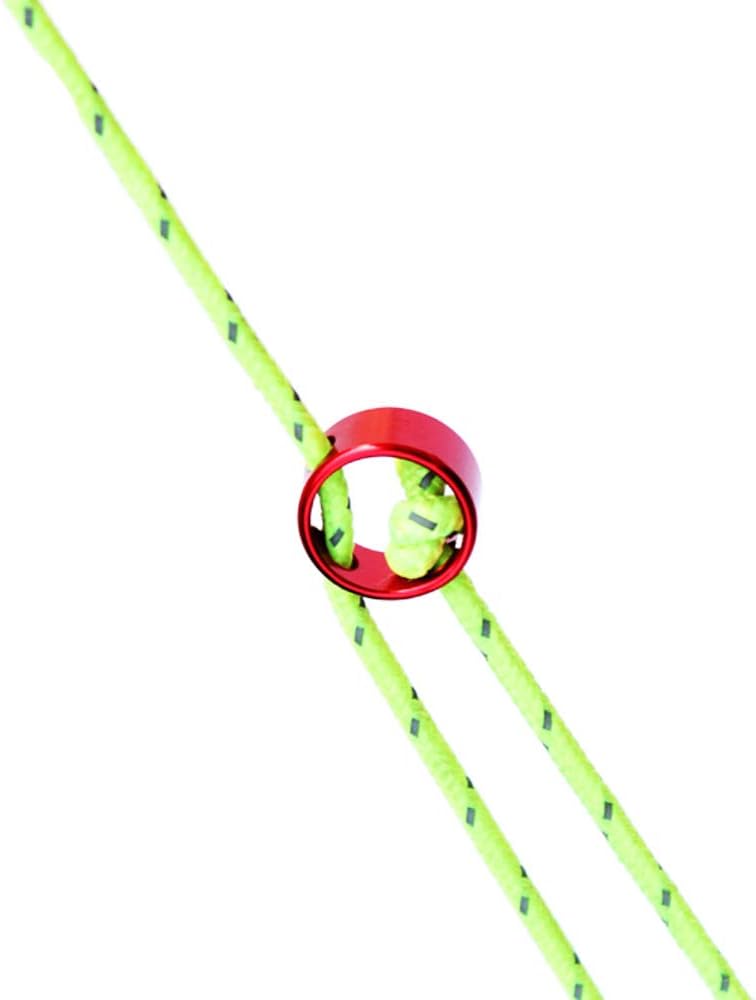
- not tested
- looks as if it would work similar but less good as classic triangle 3 hole tensioner. Might even be as bad as the 2-hole version but without a way to fix it.
- looks bigger and clunkier than a triangle tensioner
- looks very cool
small DIY wodden board
by m.hupf:
Contribution and interjection of m.hupf from medieval tent and yurt construction experience:
For thicker cotton ropes or hemp ropes and larger setups, you can also just cut and drill a 1cm thick wooden board (usually 2.5cm x 7cm x 1cm) with two holes. The holes should ideally have only 1mm more diameter than the rope cross-section. Due to the rough wooden edge, the grip is excellent with rough thick ropes under tension.
Re-tensioning is simple, but requires some experience: Pull the pull side to the peg and pull opposite side away from the peg. Easiest if done from above. To adjust larger distances, just remove tension from the rope.
When the hole's edges have become rounded after prolonged use, one can turn the board around, i.e. run the rope out and the other way in. Four different should theoretically be possible. After that, one can recycle the board thermally in a camp fire.
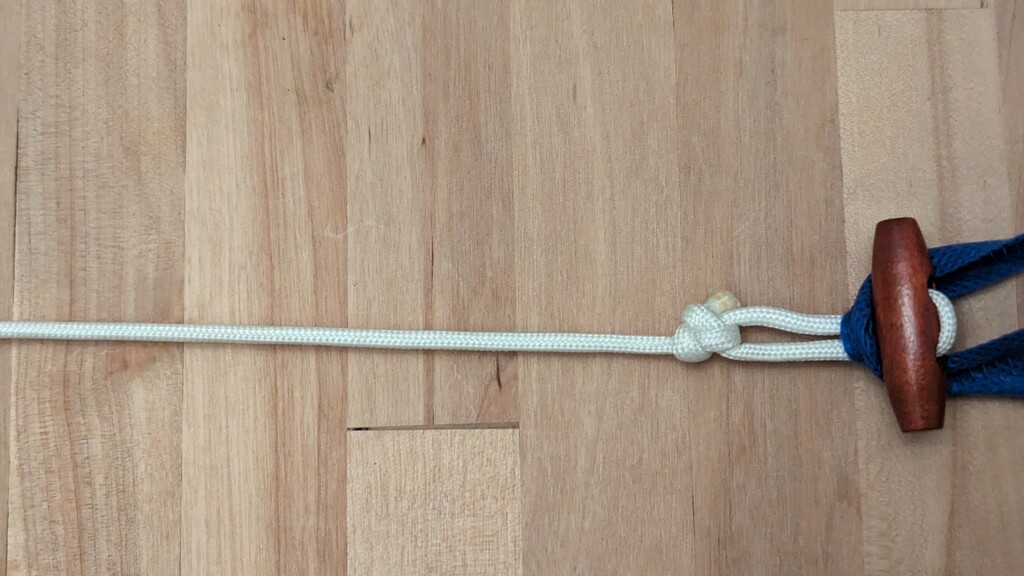
Connecting/fixing rope to tent
My new Quechua tent shipped with tent-rope that had oval toggle-buttons (oblong buttons; Knebelknöpfe) on one end.
The idea being that the rope is easy to remove from the loops mounted on the tent.
I liked the idea and imitated it by buying some of these toggle-buttons online. I think they introduced it because
- it ties into their marketing the tent as “easy”, since people don't have to tie a knot
- makes the tent better packable, as ropes don't get entangled during the folding process
- since tying down the tent is optional, have the lines permanently attached would not look good so the lines are also optional
In hindsight however, I prefer the rope that is permanently tied to the tent (e.g. with a Palstek), because
- it's quicker to deploy. The rope is already there
- I always tie down the tent
- the toggle-button can fall out while you try to fix the line if you slacken it for a moment, which is quite inconvenient
